TP2
TP2 - SIM card
Ce TP est a but éducatif uniquement
Début
- On démarre notre VM
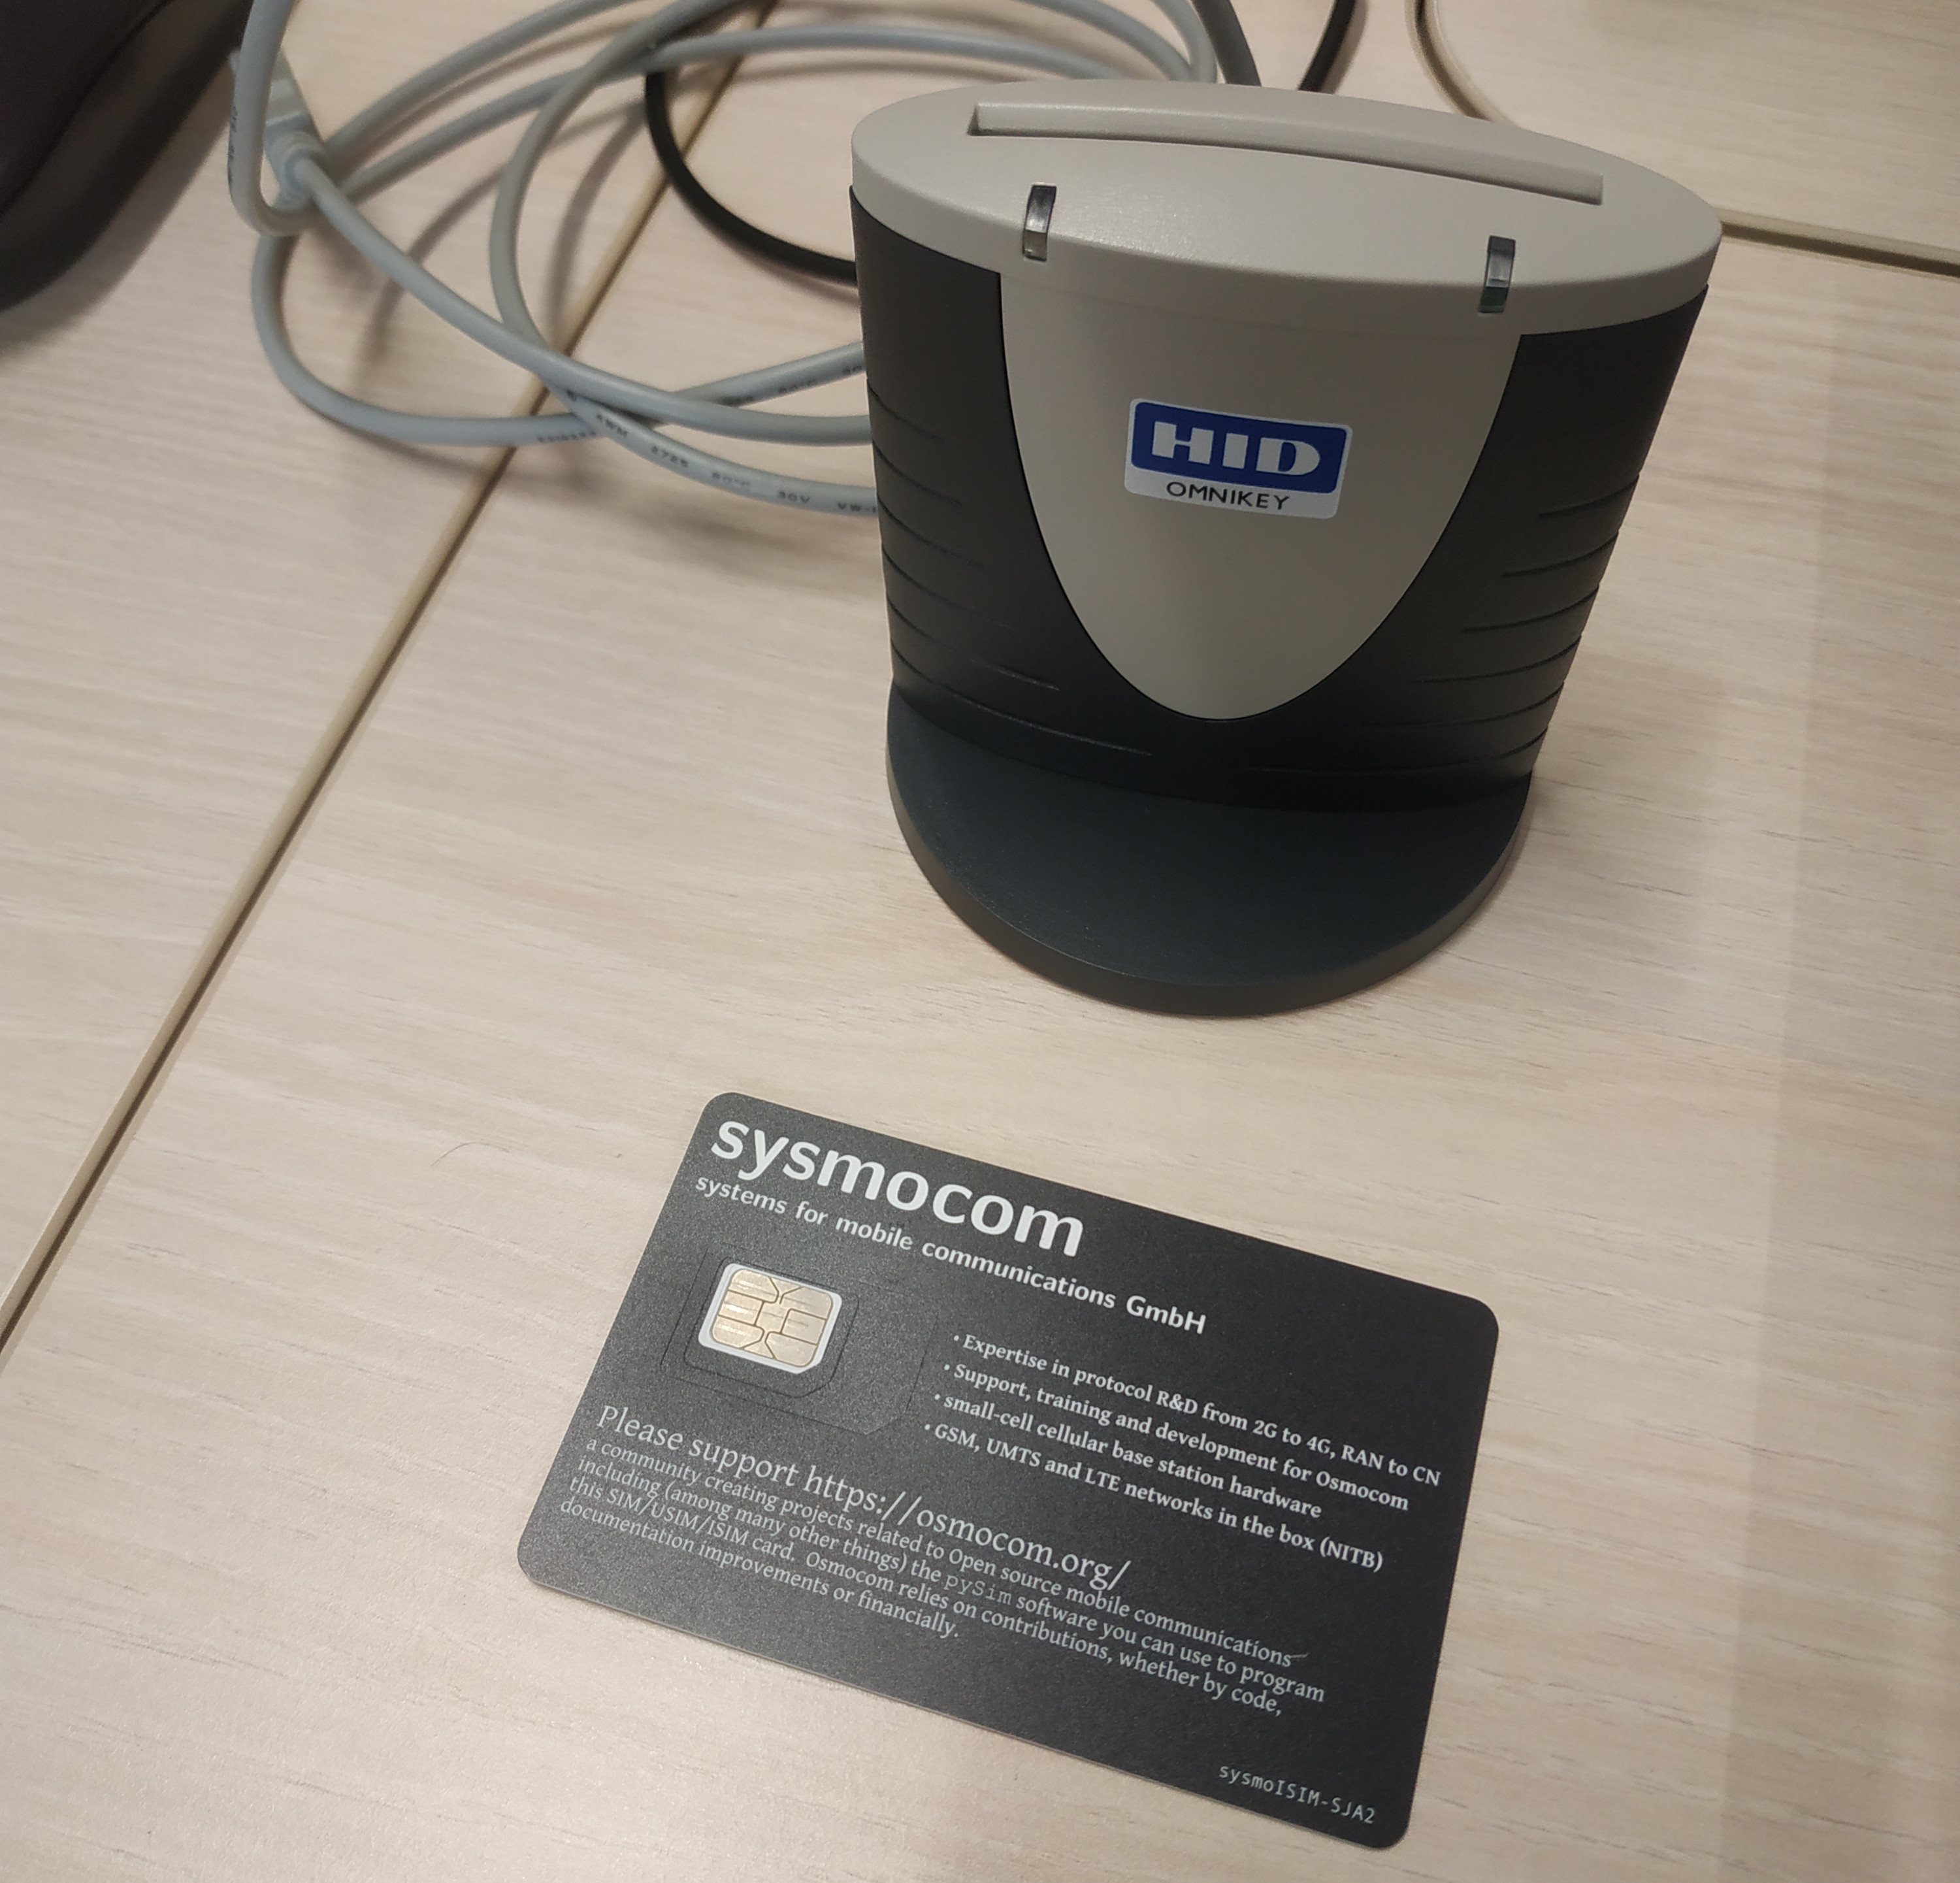
- On branche le lecteur USB
- On redirige le lecteur USB vers la VM
- On vérifie qu'on détecte bien qu'on voit le lecteur carte SIM

La carte SIM parle en utilisant le protocole APDU : https://fr.wikipedia.org/wiki/Application_Protocol_Data_Unit
PCSC server
On clone le repo de pysim (le mirroir sur github)
git clone https://github.com/osmocom/pysim
On fait l'installation des logiciels pré-requis
sudo apt-get install --no-install-recommends \
    pcscd libpcsclite-dev \
    python3 \
    python3-setuptools \
    python3-pycryptodome \
    python3-pyscard \
    python3-pip
Dans mon cas, la commande pcsc_scan n'est pas installé
sudo apt install pcsc-tools
Lorsqu'il est installé, on peut utiliser le scan
pcsc_scan
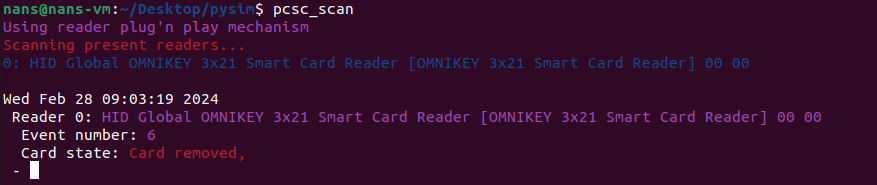
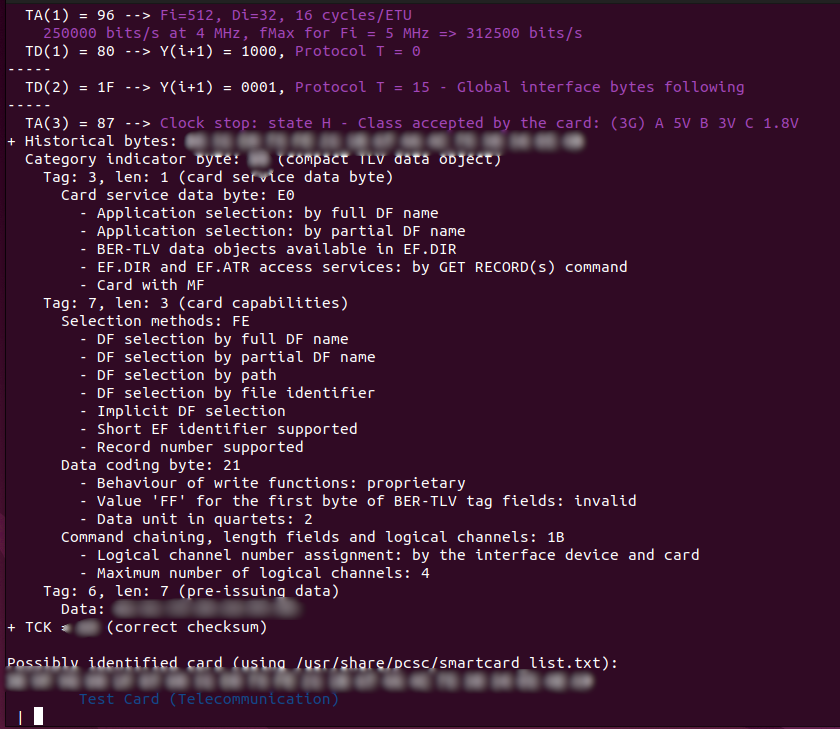
On insert la carte, on voit que le serveur pcsc détecte la carte. L'outils pscs_scan se met a jour
Le serveur pcsd tourne en tâche de fond, il permet de communiquer avec la carte
cd pysim
pip3 install --user -r requirements.txt
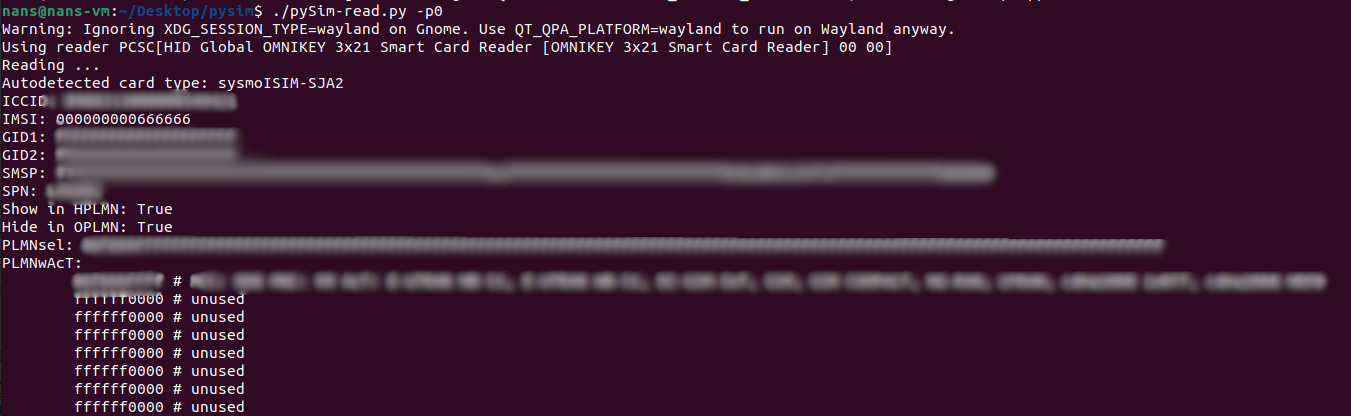
On peut commencer par faire une lecture recursive des fichiers dans la carte sim avec
./pySim-read.py -p0
Ceci est une accès simple en lecture, pour un accès interactif, on peut faire
./pySim-shell.py -p0
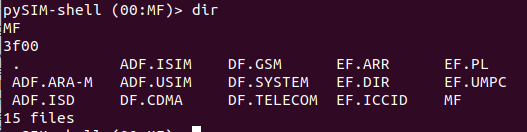
On peut voir le système de ficher.
Les noms avec DF veulent dire que c'est des directory, le EF sont des fichiers.
La carte sim peut avoir un code PIN !
On peut la dévérouiller avec la commande verify_chv PINCODE dans le shell
On peut desactiver le code PIN avec la commande disable_chv PINCODE dans le shell
Dans le shell, on peut utiliser
# lister le contenu
dir

# afficher les commandes disponibles
help

# pour rentrer dans le directory et lire le dossier
select

# Read + decode data from a transparent EF
read_binary_decoded

# quitter
quit
On peut par exemple voir l'IMSI. Il a été changé dans les séances de l'année dernière

get number of cards
# download jq
sudo apt install jq
# create a script get_iccid.script with
select EF.ICCID
read_binary_decoded | jq -r '.iccid' > iccid
quit
./pySim-shell.py -p0 --script get_iccid.script
iccid=$(cat iccid)
echo $iccid
grep $iccid simcards.csv
For me it's
| NOM | Valeur |
|---|---|
| name | Subscriber 54942 |
| iccid | $iccid |
| imsi | $imsi |
| extern | |
| ki | $key |
| opc | $opc |
| adm1 | $adm |
EDITOR=nano ./pySim-shell.py -p0

# in the sim shell
verify_adm $adm
select ADF.USIM/EF.IMSI

# check the current value
read_binary_decoded

# change the IMSI to the correct value
edit_binary_decoded

# check the change
read_binary_decoded
Il faut bien mettre le IMSI et pas le ICCID (car on aurait, par exemple, mal recopié le csv) car sinon cela rendrait la lecture et l édition du IMSI impossible
Sauf si on ajoute ce bout de code https://github.com/osmocom/pysim/pull/18 (voir aussi https://osmocom.org/issues/6385)
Tout cela est hypothétique bien sur ^^
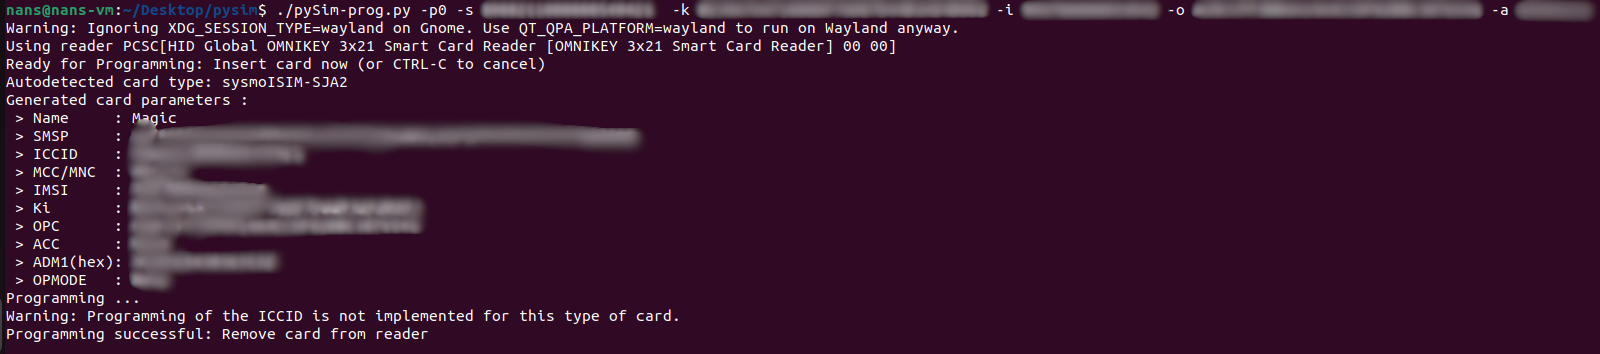
On peut également faire plus simple et utiliser la commande pySim-prog.py
./pySim-prog.py -p0 \
  -s $iccid \
  -k $key \
  -i $imsi \
  -o $opc \
  -a $adm
si k ou o ne pas pas mis, il sont aléatoire
-k KI, --ki=KI Ki (default is to randomize)
-o OPC, --opc=OPC OPC (default is to randomize)
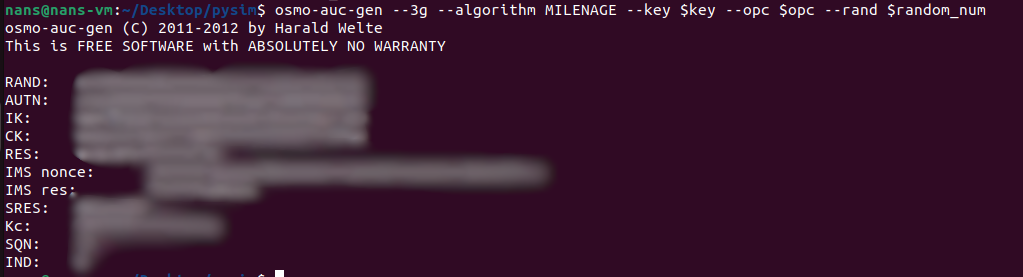
Test authentification
On va avoir besoin de osmo-auc-gen (GSM/GPRS/3G authentication testing tool)
sudo apt install libosmocore-utils
# step 1 create a random number
random_num=$(dd if=/dev/random bs=16 count=1 2>/dev/null | xxd -p -l 100)

# step 2 Generating the actual quintuple
osmo-auc-gen --3g --algorithm MILENAGE \
  --key $key \
  --opc $opc \
  --rand $random_num
# step 3 Performing authentication with the card
# ./pySim-shell.py -p0
select ADF.USIM
authenticate $rand $autn

Si on le refait, cela fail et nous donne un numéro auts
AUTS (Authentication Synchronization token) which contains an obfuscated value of the correct SQN and a hash MAC-S

On doit donc regénérer notre AUTS avec le AUTS
osmo-auc-gen --3g --algorithm MILENAGE \
  --key $key \
  --opc $opc \
  --rand $random_num \
  --auts $auts
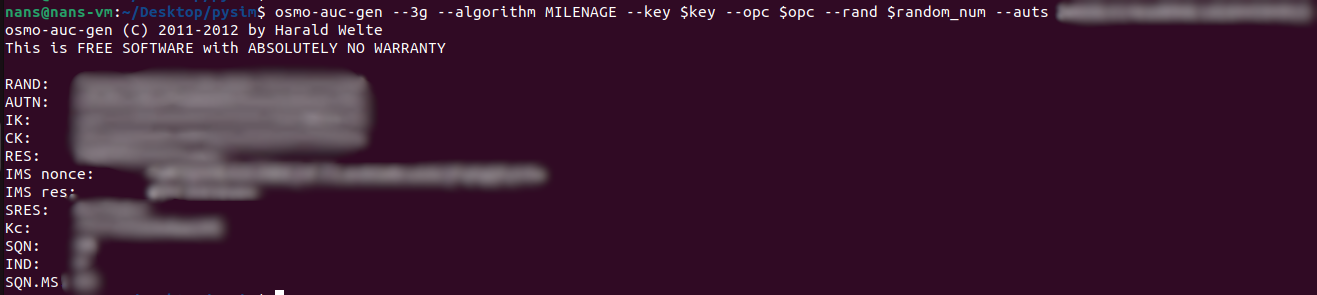
On obtient un nouveau AUTN avec lequel on peut se re-authentifier
# step 3 Performing authentication with the card
# ./pySim-shell.py -p0
select ADF.USIM
authenticate $rand $new_autn

Si on écrit mal les chiffres, on a une erreur qui nous explique que la MAC est incorrect
